
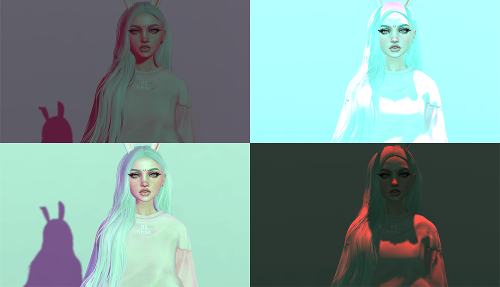
Photo Credit : Naminaeko
For anyone who is even casually a photographer in Second Life, you know that windlights are what make the beautiful shadows, delicate glows, or bold contrast in a virtual photo. As Linden Labs explains in their wiki:
WindLight is the codename for Second Life’s atmospheric rendering system that enhances skies, lighting, and other graphical aspects of the environment.
Our viewers come packed with a good number of ‘out of the box’ windlights we can use and tweak. The easiest way to change these on a whim is to go to World > Environment Editor > Environment Settings > check Customize my Environment > and play with the ‘Fixed Sky’ dropdown. To make your own windlight, you can open up Phototools and play around with the settings until it fits the mood you’re after.
However, many of us don’t have the time necessary to painstakingly alter the many sliders that make up a perfect windlight. Why not leave it to the professionals? Luckily, we can install windlights from users who have gotten them down to a science.
Where to Download
We’ve picked 5 places with professional packs of windlights to download. To begin, just download the one’s that you like to a folder on your desktop. We’ll go over the rest in the next section!
- Strawberry Singh – This page lists a number of different packs of Strawberry’s. Many to choose from!
- Naminaeko – For download are both 2015 and 2017 packs of windlights.
- Magick Thoughts – Magick even includes some water windlights which change the color & reflectiveness of SL water!
- Shaedynlee – Not only are there windlights for download, but she explains how to create windlights of your own!
- Steffy Ghost – Four whimsical and delicate windlights for a feminine feel.
How to Install
- First, shut down Second Life
- Unpack the zip files that you downloaded and get them ready in one folder.
- Drag your unzipped windlights into one of these folders: ** NOTE : If you are not using the Second Life viewer, you will need to replace the part in the filepath that says ‘Second Life’ with the viewer you are using.
Windows XP – C:\Documents and Settings\USERNAME\Application Data\SecondLife\user_settings\windlight\skies
Windows Vista & 7 – C:\Users\USERNAME\AppData\Roaming\SecondLife\user_settings\windlight\skies
or
C:\Program Files\SecondLifeViewer\app_settings\windlight\skies
Mac – use Go menu > Go to Folder and paste in: ~/Library/Application Support/SecondLife/user_settings/windlight/skies
That’s it! You’ll be able to open Second Life and see your windlights ready to use. Credit goes to Strawberry Singh for instructions and file paths.
Delilah Greyson (amoralie.triellis)
ZoHa Islands Blogger